16 Best Practices to Improve Email Deliverability
Last Updated: April 2nd, 2025
For any business relying on email, poor email deliverability is a silent growth killer.
Low open rates, sudden drops in engagement, or unusually high bounce rates could all be signs your emails aren’t making it to the inbox. And when emails land in spam or are blocked altogether, it directly impacts your revenue, engagement, and brand trust.
So what is email deliverability, exactly?
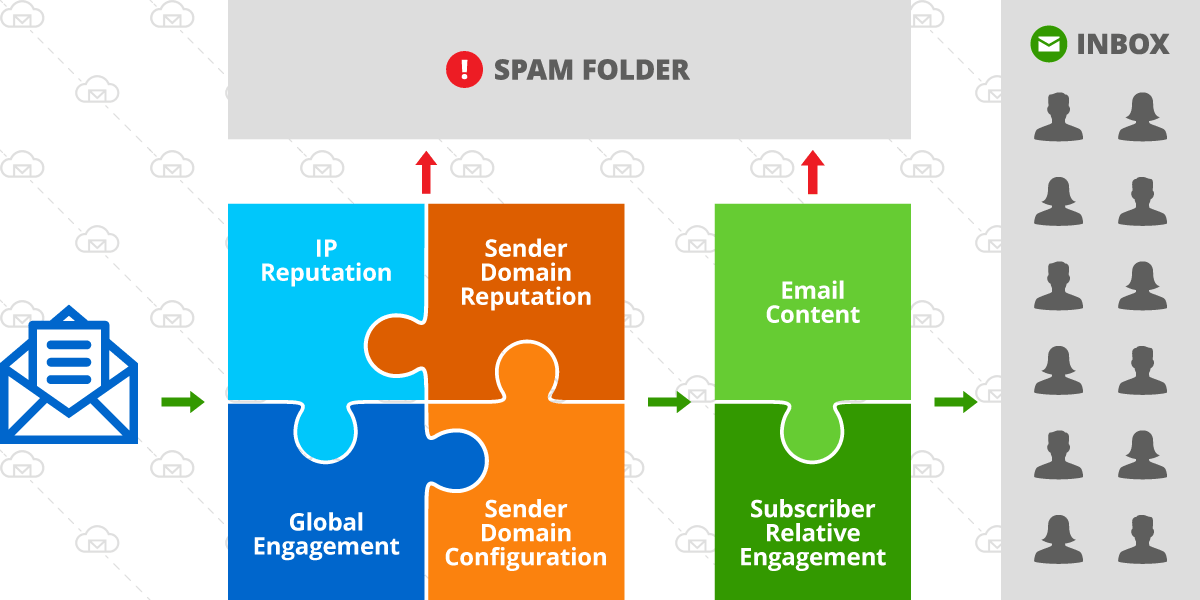
Email deliverability is your ability to land emails in subscribers’ main inbox (not spam or promotions). It’s different from email delivery, which simply means your email reached a server (even if it landed in spam).
The main influences on your deliverability are:
- IP reputation of the sending server
- Sender domain reputation
- Sender domain configuration and authentication
- Global email engagement (overtime, across campaigns)
- Content and format of the email
- Relative engagement for you (sender) versus other senders in the recipients’ inbox

In the diagram above, the green box represents factors that vary and change more with each campaign sent, and the square on the left with 4 factors are not subject to dramatic changes on a per-campaign basis.
These tried-and-tested email deliverability best practices have helped hundreds of BigMailer customers dramatically improve deliverability and inbox placement — and they’ll do the same for you. Implement these to guarantee reliable inboxing and better engagement:
Sender Setup
- Choose an email provider with a good IP reputation
- Configuring sender domain
- Set up a custom tracking domain
- Optimize sender “From” label and address
Sender Reputation Management
Ongoing Content and Engagement Optimizations
- Personalize with custom conditions
- Optimize subject line and preview text
- Avoid spam keywords (especially in the subject line)
- Encourage engagement in your emails
- Optimize images
- Test emails against spam filters BEFORE sending
- Send when your audience is most likely to engage
- Throttle email sending
- Prioritize sending to more engagement segments
- Only send relevant, engaging content
Sender Setup
Ensuring you have high email deliverability and proper inbox placement starts before you hit “Send” on your first email.
Your sender setup — IP reputation, domain authentication, and even your “From” label — helps signal to inbox providers whether you’re a trustworthy sender or a spammer.
Here’s how to get set it up right from the start.
1. Choose an email provider with a good IP reputation
Until you’re a customer of an email marketing platform, there’s no way to be certain of what your sending IP reputation will be.
But generally, you pay more to be “in good company,” meaning the very cheap platforms or pricing plans are likely to have IPs that have a worse reputation and more deliverability issues.
You can search through reviews on sites like G2 or Capterra to see what customers are saying about their deliverability and any IP reputation issues.
Good ESPs don’t let just anyone sign up and blast emails. They vet and approve new senders, require domain verification, and often throttle sending for new accounts to protect IP reputation.
2. Configuring sender domain
While this step used to be optional with most email service providers (ESPs), prior to 2024 Yahoogle updates, serious marketers never skipped this step.
You must verify your sender domain with DNS records and DomainKeys Identified Mail (DKIM) defined. Google also requires those who send more than 5,000 emails per day to set up a DMARC record. These records are added via your DNS settings, and updates can take a few hours to go live.
Use a different sender domain and IP addresses for any cold email campaigns, which have the lowest engagement and can hurt your sender reputation. You shouldn’t send any cold outreach emails from your email marketing platform.
You should also consider using a different sender identity for your marketing and transactional emails to ensure your transactional email delivery doesn’t get affected by your bulk campaign practices.
3. Set up a custom tracking domain
A custom tracking domain replaces your email provider’s default tracking domain to handle link tracking.
Using one helps your emails appear more authentic and helps with inbox placement.
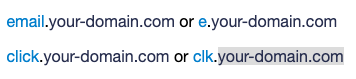
Typically, a custom tracking domain uses the same domain as your sender address, but on a different sub-domain. For example, if your sender is sales@your-domain.com, you can use email.your-domain.com as your tracking domain.
You can see your current tracking domain by hovering over a link in your sent email message while in your inbox.
Not all ESPs offer the option to specify a custom tracking domain, so check with your provider for instructions.
4. Optimize sender “From” label and address
Optimizing your sender “From” label and sending email address builds trust with recipients and reduces the chance of your email being flagged as spam.
Specify a useful sender email address
Be it a question or general feedback, email recipients often want to reply to the messages they receive. Since most ESPs use the sender email as a reply-to address, it’s best for the sender email address to accept emails that go to your support (or sales) team or at least forwards to them.
Avoid using a no-reply address (such as noreply@your-domain.com) for 3 reasons:
- Replies are part of the engagement metrics that email service providers (like Gmail) use to determine whether your email belongs in the inbox or spam folder.
- Recipients sometimes request removal from a mailing list, and if they see “noreply@your-domain.com” they’re more likely to hit “Spam” or “Complain” (the worst engagement you can get).
- Some recipient’s filters and email settings automatically send “no-reply” emails to the junk folder.
Use a descriptive From label
Clever subject lines help you stand out in a crowded inbox, but your subscribers still need to recognize your brand when they scan their inbox. A misleading From label is against Yahoogle guidelines and is likely to result in emails going to spam folder.
Consider these 3 basic options for sender labels:
- Brand or Product Name
- Brand or Product Name + Function (e.g., Support, Sales)
- First Name at/from [Brand or Product Name]
With the third option, consider the name of the person and your product name: Will the entire label fit in the “From” field?
Whatever format you choose, be consistent across all of your sender accounts. Test for appearance in common email programs before you start using a new sender label.
Sender Reputation Management
To avoid the spam folder consistently you need to monitor your sender reputation and maintain a clean list that engages with your emails.
Here’s how…
5. Monitor sender reputation
There are several parts to sender reputation:
- Blacklists – referenced by EPSs, but monitored by 3rd party organizations
- IP reputation – managed by ESPs and monitored by each mailbox provider
- Sender history – maintained by each mailbox provider
Let’s break down how to properly monitor each.
Blacklists
A blacklisted domain or IP is flagged by the organization managing blacklists when someone reports a given email or sender as spam. If either is blacklisted, your emails are likely to be blocked or sent to spam folders.
You can monitor if your domain (or IP, if you use dedicated) gets blacklisted by using a blacklist monitoring service. These will notify you when you’ve been blacklisted so you can take swift action to fix the root cause and request to be delisted by the blacklist provider.
Alternatively, you can do a manual check on major blacklist providers’ websites (like Barracuda, Spamhaus, Spamcop, and many more).
IP Reputation
An IP (internet protocol) address is a unique address that identifies a device (computer or server) on the internet or a local network.
The biggest factor in IP reputation is whether it’s blacklisted.
Regularly check on your domain/IP health by signing up for a deliverability monitoring tool, like Google Postmasters. This will rate your current reputation to help you decide when you should make adjustments.
By default, hosted email services send your emails through a shared pool of IP addresses, meaning you share your IP reputation with other senders on the platform.
If your current sending IP pool has a poor reputation, you can try asking your provider if you can get moved to a new IP with a better reputation.
Or if you’re a high-volume sender, you can ask for a dedicated IP, but these usually come with hefty price tags (for example, $250 per IP at Kit).
Sender History
There are several factors that mailbox providers take into consideration:
- Domain age – recently registered domains will be treated as more suspicious
- Domain sending history – any sudden jumps (more than 20% per day) in volume signal inorganic (e.g. list purchase) list growth
- Domain historical engagement – the lower the engagement rates, the lower the likelihood of future inboxing
To maintain a healthy sender reputation, warm up new domains with low-volume sending and maintain high engagement rates by sending less frequently to inactive subscribers.
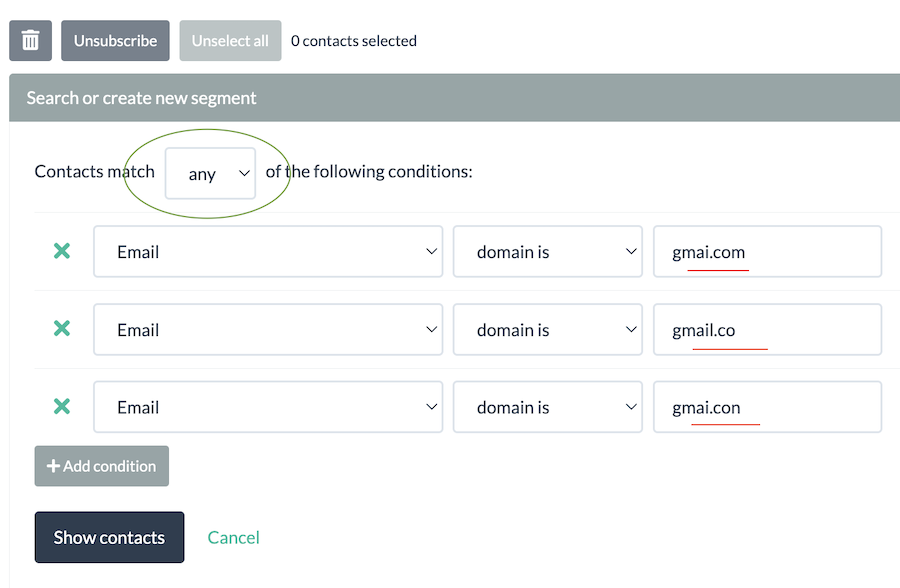
6. List management
List quality is a huge factor influencing deliverability, yet many new email marketers overlook it.
A mistake as simple as sending to older lists can damage your sender reputation. So just because subscribers “opted-in” directly on your website – doesn’t mean it’s all good.
Clean and verify your list
Sending to invalid emails hurts overall engagement and tells mailbox providers that you’re not following list management best practices.
I recommend verifying contacts that haven’t been engaged in 2+ months since email lists typically decay at an average rate of 2-3% per month (this can be higher for B2B lists).
Skipping verification can lead to a high hard bounce rate, which negatively affects deliverability and can lead to ESPs pausing your campaigns to prevent further damage.
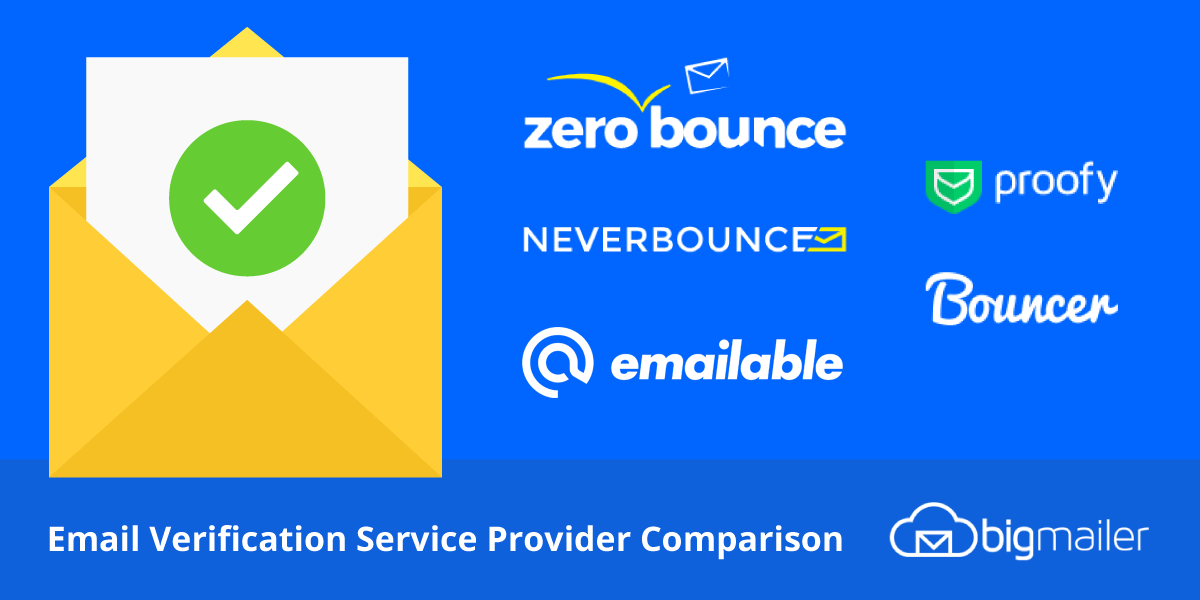
In a typical verification process, you upload a CSV file to an email verification tool and once validation is complete, you see stats on the results and options to download your verified list. Most verification services produce at least these 4 statuses:
- Deliverable – these emails are safe to send to
- Undeliverable – these addresses no longer exist and should not be sent to
- Risky – these emails are likely to result in a high bounce rate (often catch-all addresses)
- Unknown – these emails couldn’t be verified so they may result in a high bounce rate
If your email verification provider allows it, download Deliverable, Risky, and Unknown as separate lists and upload them into your email marketing platform.
If you’re starting fresh with a new service provider, ONLY send your 1st campaign to Deliverable addresses to ensure the lowest possible bounce rate.
Many providers move you onto a shared IP pool tier that correlates to your 1st campaign or campaigns sent in the first 1-2 days.
On average, email lists identified as Risky or Unknown by email verification providers result in a 30% bounce rate, so they should be slowly added into large bulk campaigns over time.
In BigMailer, you can auto pause campaigns with hard bounces at % you set.
Try BigMailer for free with all features included (except white-label), or schedule a demo.
Identify and remove spam traps
Spam traps (also called honeypots) are email addresses used to identify and monitor spam emails by ISPs, anti-spam organizations, and blocklist operators.
Sending to spam traps is an obvious sign that you’re not following email best practices, and as a result, your sender reputation will take a hit.
If you either purchase your email lists or scrape email addresses from the web, there’s a good chance you have a lot of spam traps on your list.
Even if your list is all opted-in, you can still have typo spam traps, which will not interact with your email like real subscribers and eventually need to be removed for inactivity.
Search your list for common typo domains to see if you have an issue. If you have a few typos, you are likely to have many more.
You might also be sending to “recycled spam traps” without even knowing it. Recycled spam traps are emails that used to be valid but were repurposed for trapping spam.
If you’re a BigMailer customer, our built-in email verification will remove invalid, typos, and some pristine spam traps.
Make unsubscribing easy
Making it easy to unsubscribe might not seem helpful to senders, but it is. Otherwise, frustrated recipients may mark emails as spam and damage your sender reputation.
The unsubscribe link should not require users to log in to manage their preferences. This is a practice increasingly used by high-profile brands with custom in-house email tools that actually violate anti-spam laws.
You must provide a straightforward way to get off your email list and honor requests in a timely manner.
Your unsubscribe or “subscription preferences” link must clearly allow users to opt-out entirely or choose specific message types they’d prefer. The latter option is especially beneficial under GDPR laws, which require explicit, separate consent for each type of email (product updates, promotional content, partner offers, etc.).
Keep unsubscribe link text labels simple – “Unsubscribe” or “Opt-out” – because mailbox providers scan emails to verify this link’s presence during bulk campaigns. Sometimes, just missing the unsubscribe link (like on a test email) can make a difference for inboxing.
Don’t use a small font or push unsubscribe links down deep into the email footer where it’s hard to find.
Not all ESPs offer an easy way to set up an unsubscribe page with preferences, but it’s worth spending the time to investigate and implement it.
Segment your list
Segmentation (which helps with personalization) are key to inboxing for large-volume senders, because it offers an opportunity to:
- Break down your overall list into smaller segments for engagement optimization
- Optimize send time for best engagement (based on location)
- Optimize target audience for a more relevant message
- Customize and personalize content based on custom fields
All these strategies can help you inbox better. Personalized content is especially helpful for inboxing or avoiding Gmail’s Promotions tab (more on that later).
You can create segments of your list based on shared behavior, characteristics, and data collected from fields on your signup forms.
To optimize your send time based on your target audience location, you can capture the country or timezone at the time of email capture. Some providers, like BigMailer, automatically capture subscribers’ locations on their forms.
Pro tip: If you only have custom fields — like first name — for only part of your list, using conditional logic within your email templates helps you tailor content only when that data is available, avoiding awkward blank spots or formatting issues.
Ongoing Content and Engagement Optimization
These best practices are for continuously improving and ensuring your emails hit your recipients’ main inboxes.
So you’ll want to save these tips for any future campaign you send.
7. Personalize with custom conditions
Personalized emails get better engagement, which in turn, helps your future inboxing. Bulk emails that are all the same are more likely to land in Gmail’s promotions tab.
For example, if you have a first name available, you can use a merge tag to add a name into the subject line or preview and email body as a greeting.
If you don’t have any custom fields you could still create multiple versions of the subject line using a subject line AB testing feature (available with BigMailer).
To personalize the email body, you can use conditional logic for “email starts with + [letter]” and create variations of the content in your email, which might not appear as personalized to recipients, but may help with inboxing because it appears less “bulk”.
Conditional statements inside your email templates help you make your emails more relevant to recipients, even if you don’t have custom fields in your entire list.
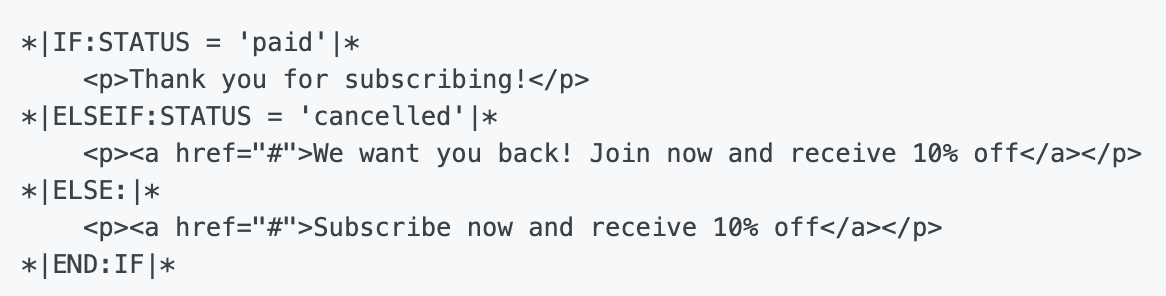
You can get really creative with custom conditions. For example, these ideas for personalized emails from Litmus suggest countdown timers, personalized images, and other types of content to stand out in crowded inboxes.
8. Optimize subject line and preview text
The keywords used in the subject line weigh heavily into the spam score mailbox providers assign to an email. This is why short subject lines perform the best when it comes to inbox placement.
My rule of thumb is to keep your subject line 3-4 words and continue it in the preview field.
While it isn’t always a visible element of your email’s design, preview text provides valuable real estate to expand your message. Think of it as a second subject line – an additional opportunity to convince your recipients to open your email.
And the better your open and engagement rates are, the better chance you have of landing in the inbox.
Many platforms, including BigMailer, support specifying this text. If your platform doesn’t support it, you can have a pre-header element as part of your email template design. So your preview text can be the first line of text in your email (which can be hidden text).

Notice how in the example above, 1 sender didn’t update the placeholder text with their own. Don’t let that happen to you!
9. Avoid spam keywords (especially in the subject line)
Using spam keywords in your subject line, preview text, and email body can contribute to a spam score that mailbox providers assign to an email.
Spam keywords in the subject line will carry the most weight, so pay extra attention to those.
The spam keywords that often get “flagged” are usually overly salesy, pushy, and clickbaity. In other words, avoid words that make it sound like you’re just trying to get a quick sale.
The most common spam phrase I see marketers use is “CLICK HERE” and it is a spam phrase to avoid.
I recommend skimming through these SPAM keyword lists:
10. Encourage engagement in your emails
If you’re just starting out, focus on generating and maintaining high engagement with your new subscribers (replies, clicks, opens, etc.).
Always send a welcome email with a goal to engage – ask a question (to encourage a reply), offer your best content, etc. This will increase your odds of future emails going into a subscriber’s main inbox.
Examples of questions to ask in your welcome email:
- Tell me who you are? (Useful if you have different types of audiences)
- What topics are you interested in?
- What would you like me to write about?
Continue to ask questions to your audience in future emails to encourage replies (one of the most positive signals that your content is relevant to your audience).
Then, in future campaigns, it’s helpful to mix in other ways to encourage clicks with:
- Enticing CTA for an offer or resource
- Polls on hot topics in your industry
- Clickable video thumbnails, buttons, and graphics
11. Optimize images
Images can make your emails more engaging, but they can also hurt your deliverability if not optimized to load quickly, look good on all devices, and have descriptive ALT text.
Large images may load slowly and can push your email over the 102KB limit or get cut off in inboxes. Both will hurt your engagement.
Compress images yourself (with tools like Kraken.io) and keep widths at 600px — don’t rely on your email platform to resize them.
Emails that contain only images without ALT text or misleading ALT text can often trigger spam filters. To help avoid this, add descriptive alt text to every image to give spam filters more readable content and make your email look more trustworthy.
Descriptive ALT text also makes your email more accessible to the impaired and gives context to recipients if the images don’t load.
Finally, preview images on desktop and mobile screens to ensure they’re clear and easy to understand at a glance (someone shouldn’t have to think hard about what the images are).
12. Test emails against spam filters BEFORE sending
Testing every email adds an extra step, but it’s an incredibly important one. Because testing typically has to happen outside of an email marketing platform you may be tempted to skip it. You shouldn’t if you have a large list or email is critical to your business – it may mean the difference between your message being successfully delivered or it being flagged as spam.
We recommend the free tool mail-tester.com for troubleshooting your email for inboxing.
With that said, even experienced marketers using these tools can’t avoid landing an email in the spam folder every once in a while – this is especially true for Gmail and is often due to the topic of the message. Just check out this example of an email from Starbucks – probably the only version that ever landed into the Spam folder in many years.
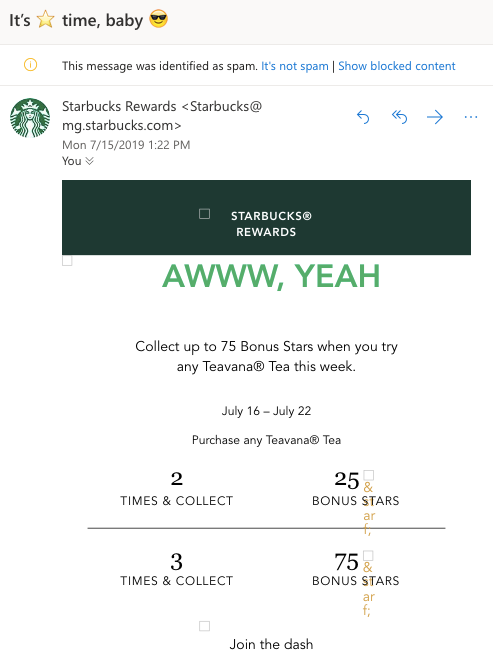
Example of a high-quality email and sender in spam folder
Don’t stress – if the occasional email gets a low engagement rate because a few spam keywords made it into your message, know that you’re not alone.
13. Send when your audience is most likely to engage
If you have any location data for your customers, segment your list by location and time zone to optimize delivery based on local time.
Some providers, like BigMailer, automatically capture location on email collection forms and clicks. So, you may have location data on your subscribers even if you’re not intentionally collecting it.
You should test different sending times to find the best time for your specific audience, but in general, this is what I’ve found to work best:
- Best general send times for news, content, and business updates: Monday-Friday 7am-10am
- Best time for CTAs that require time to complete (like shopping): Lunch time or 3-4pm
- Good general send times: Monday-Friday 6am-3pm
Generally, most emails are checked during work hours, so avoid sending after 5pm on workdays (it’s a very low engagement time).
If you don’t have location data for your subscribers, send earlier just to be safe.
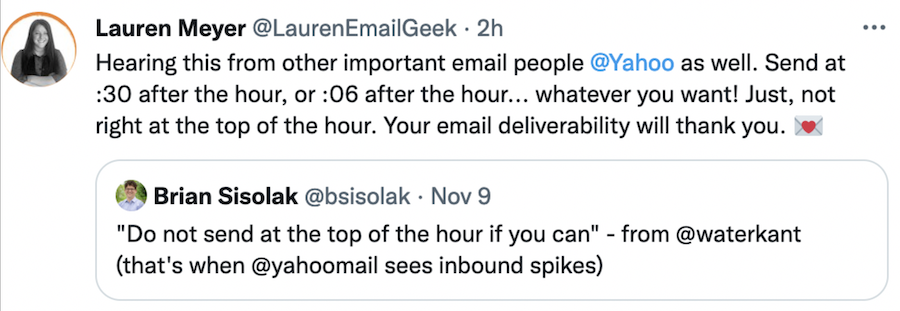
Pro tip: Don’t schedule your campaigns for top of the hour if they typically deliver within 1 hour. Email traffic spikes at that time and Yahoo/AOL will delay delivery at a higher rate.
14. Throttle email sending
Email throttling is slowing the rate at which emails are sent, compared to blasting your entire list at once at max speed. If your list is large (over 100k), slowing down your send rate can improve inbox placement, protect sender reputation, and boost overall deliverability.
Sending to a large list all at once can raise red flags with mailbox providers because it mimics spammy behavior. If their filters detect a sudden volume spike, especially to cold or unengaged contacts, your emails may get sent to spam or rejected entirely.
Throttling is especially useful for very large lists (e.g., 1 million+ contacts), but it’s also smart to do during high-traffic seasons or times. It’s also helpful when emailing new subscribers or less-engaged segments, as it prevents getting too many bounces, spam complaints, or poor engagement metrics at once.
If you’re sending from a new IP or domain, throttling can help you appear more trustworthy to mailbox providers and ESPs.
Some platforms, like BigMailer, offer built-in throttling features you can enable automatically.
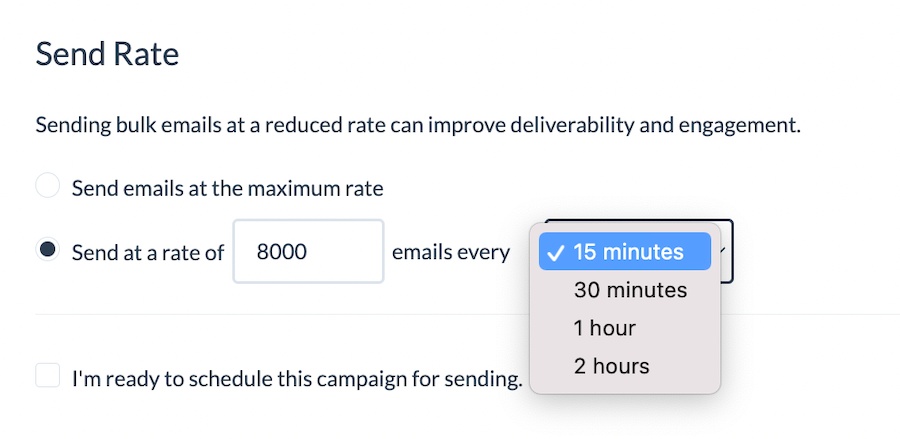
But if your ESP doesn’t support this, you can still manually throttle by breaking your list into smaller segments and spreading the send across times or days.
15. Prioritize sending to more engagement segments
One of the best ways to address both low engagement and a high complaint rate is to email inactive subscribers less often.
When someone checks their email infrequently, and they see 2+ daily emails from the same sender, they’re more likely to mark them as spam (and they can flag every email from a sender, not just one).
To land in the inbox, you need to maintain a high engagement rate overall, which means sending MORE to actives and LESS to inactives.
Mailbox providers like Gmail and Hotmail are very sensitive to historical engagement. So, if a recipient doesn’t open 5+ emails from a sender in a short period of time, future emails are highly likely to go to spam. Consider this when deciding on your sending frequency.
The only way to override spam filtering is to have the recipient manually drag your email out of the spam folder or mark it as “Not Spam.” Reducing your email frequency improves your chances of the recipient opening your email before they start going into the Spam folder.
Sounds like a lot of work? You can automate sending more to actives and less to inactives by defining reusable segments to use in your campaigns.
Here are some segmentation rule examples that may help if you send emails frequently:
Recently Active – Opened/Clicked Any Campaign in the last X days or recently added.
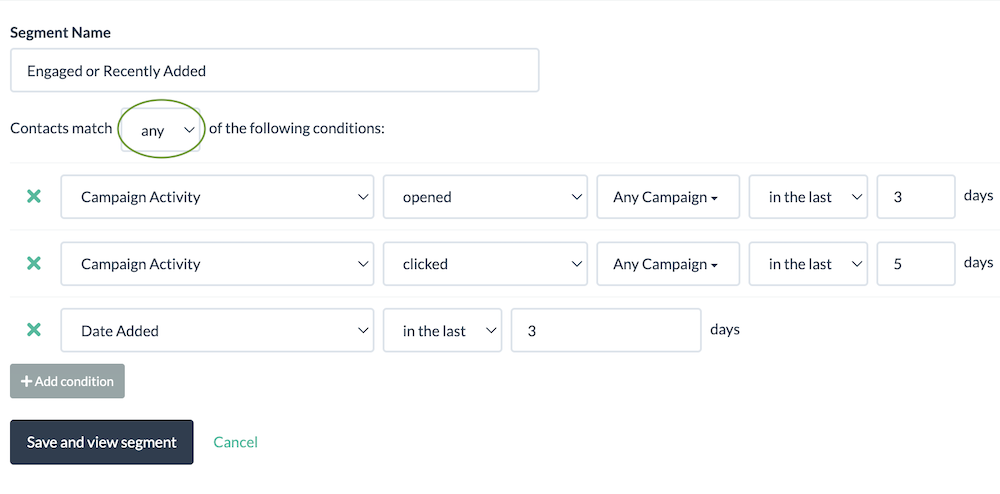
Consider your sending frequency when defining “active” subscribers. For example, if you email daily, “active” subscribers might only be those who opened in the last 5-7 days. If you email weekly, you can reasonably extend that window to 14–21 days.
16. Only send relevant, engaging content
If your emails don’t deliver that value, subscribers will tune out, unsubscribe, or mark you as spam — hurting your engagement and deliverability.
Focus on sending content your audience actually wants and when they want it. Understand their pains, goals, and where they are in your buyer journey, then tailor your emails accordingly.
Sales are important, but constant pitching kills engagement — aim for a 4:1 ratio of value to promotion to keep your audience responsive.
Ready to Improve Your Email Deliverability?
Sick of poor email deliverability and unhelpful support with your current email marketing platform?
BigMailer is an email marketing platform that comes with the tools you need to improve your email deliverability – from built-in email verification and advanced segmentation to the option to configure a custom tracking domain and access live chat support.
BigMailer is an especially great fit for high-volume senders like franchises or agencies that need white-label capabilities.
Curious to learn more? Reach out to us via chat or schedule a demo.
Or, if you’re ready to give BigMailer a try, get started with a free account.


Email Marketing Tips in Your Inbox
Only the good stuff - expert tips, best content, and no spam ever.