by Lilia | Oct 4, 2019 | Help
There are many reasons why you may need to export your lists or segments, let’s review most common use cases and best approach.
- GOOD. Identify and delete unengaged contacts. This is a good practice – removing unengaged emails (e.g. anyone who hasn’t opened your emails for 90-120 days) from your list to improve engagement and protect your sender reputation. Just make sure to exclude those contacts that were added to your list recently and haven’t had a chance to engaged yet. Low engagement leads to lower inbox placement overtime.
- GOOD. Update or sync your unsubscribe, bounces, complaints with internal database or another platform, e.g. a CRM. There are 2 options – manual one-time export or using our webhooks to send event data to your application for processing.
- BAD. Delete your unsubscribes and bounces to reduce overall list size and cost associated with storing those contacts. BigMailer uses this data to ensure no emails go out to these email addresses, so if you accidentally bring those records back onto the platform you are risking a) those who unsubscribed will hit complaint/spam button, which will negatively affect your sender reputation b) high bounce rate on any campaign or over a time period can affect your future deliverability and inbox placement. If you have very tight control over your list management and re-importing bounced email addresses isn’t a possibility then removing old bounces may be ok. Typically, unsubscribe rate is very low so removing those records is more risk than it’s worth to save a small % of the monthly fee.
NOTE: BigMailer doesn’t allow you to remove contacts that were sent an email in the last 21 days. That’s because when a contact is removed from BigMailer account, the Unsubscribe page no longer works for the removed email address, so the email recipient is more likely to hit Complaint/Spam button, which hurts sender reputation.
How to Export a Segment
First, go to the Lists tab in the site header to see all your Lists. Click on the arrow down link on the grey button next to the List you need to export.
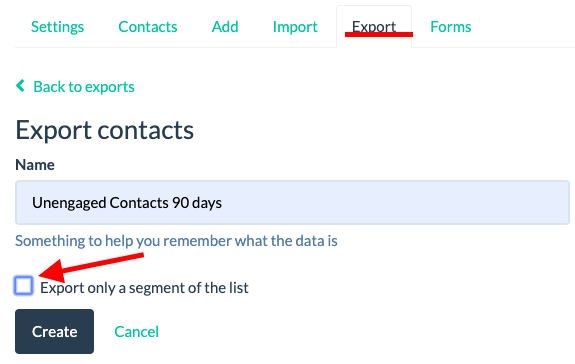
Give your export a name that will help you recognize it later on – recent exports will be stored for you in a list. If you need to export only a segment of your list, click on the checkbox above the Create button, to load the segmentation options.
You will most likely need to define a new segment for the export.
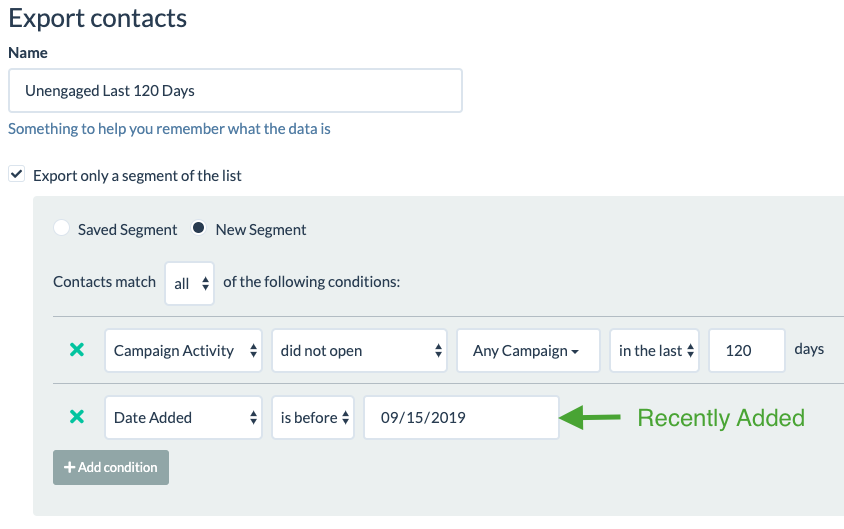
Make sure to add a condition to exclude those contacts that were added to your list recently, if you plan to remove Unengaged contacts. Recently added contacts are most likely to engage with your content, so it would be a costly mistake to make to remove them.
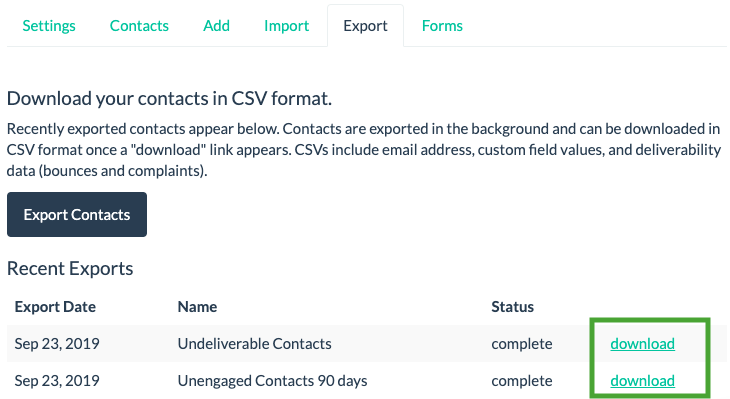
Once you define the segment, click Create. Depending on the List or segment size, a link will be generated within seconds or minutes for you to download your data as .csv file.
How to Delete Contacts
There are a 3 different ways to delete contacts on BigMailer:
1. Upload a file with contacts to delete
If you want to upload a file of users to delete across all your lists (for example as a result of unsubscribes outside BigMailer) you can use “Delete Contacts” button on the Lists main page, see:

2. Select and delete contacts manually
You can manually delete contacts 1 by 1 on contacts view – just click on the Lists name and use Search (Email is) to locate the contact you want to delete. We don’t recommend you use this options for your subscribers and instead edit those contacts Unsubscribe setting or remove them from specific Lists. Once a contact is deleted ALL history is deleted. This option is best for deleting your own test records.
3. Delete a List
 Follow these steps to delete any List:
- Go to Lists tab to see all you Lists
- Click on the arrow down icon on the button next to the List
You will have 2 options:
- To delete a List only, this means only the label will be deleted from the list view, all the contacts in the list will remain unchanged.
- To delete the List and all contacts in that list, by checking the box next to “Also delete all contacts in this list”.
 If you choose this option, all contacts in this list will be removed across all your lists in a single brand. Contacts deletion will be scheduled for removal within 24 hours and appear as Pending until it’s complete.
How to Delete a List Segment
If you want to delete a segment, you need to create a segment then export it and follow instructions in the “Upload a file with contacts to delete” section above.
Send Events to Your Application With a Webhook
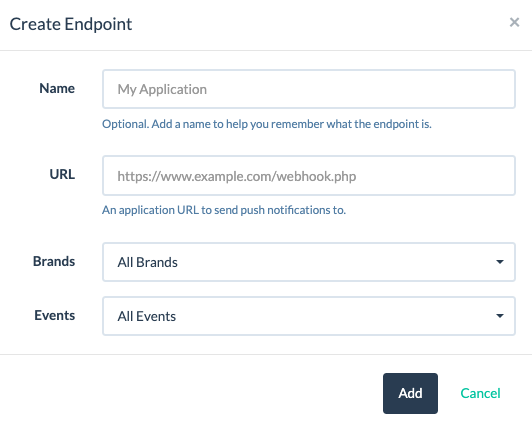
You can configure a webhook to send events to on your API page. See this article for best practices and code samples.

You can choose to send the following event data – bounces, complaints, and unsubscribe.
Got a use case we didn’t cover in this article? Let us know so we may expand it.

by Lilia | Aug 28, 2019 | Help
Experienced marketers know that smart volume management is part of the sender reputation management, especially for high volume senders. If your list is smaller than 5000 emails, then this isn’t something you need to worry about and as long as you build your list overtime and increase sending volume gradually. Also, if you or your organization is a sender with an established reputation and a history of high volume sending, the volume isn’t as big of an issue as campaign engagement and future deliverability.
You need to carefully manage your sending volumes in order to build up your sender reputation if you are:
- Just starting out with bulk campaigns for yourself or a client, or
- Haven’t engaged your list of 5k+ subscribers in the recent months
- Switching your sender domain, email address, and/or provider, possibly due to a “burnt” reputation in the past.
Why not blast a single email campaign to your entire list? Because if this volume of sending isn’t typical for your sender identity it will look suspicious to a mailbox provider (aka ISPs) because big changes in sending volume may indicate that a list hasn’t been grown organically (naturally), bur rather rented, purchased, or harvested via other means, and this can have a negative impact on email deliverability and inbox placement. So what should you do? Start by sending low daily volumes and build up volume over time – the idea is to send less than 1k emails per day per provider when you are just starting out, and ideally start with high quality messaging and high engagement subscriber segments.
High engagement on your early bulk campaigns will aid your sender reputation score and improve inbox placement rates on future campaigns.
There are a many different ways you can break down your list:
- Segment your list based on a field like “Date Signed Up”, “Order Date”, or similar date or number based fields that indicate subscriber recency or loyalty, and start sending initial campaigns to your recently engaged or your most loyal customers.
- Based on demographics like age or gender, or a number-based field like “Member ID” with “greater/less than” condition.
- Based on past campaign engagement, e.g. anyone who “opened” any campaign in the last 14-21 days.
- Segment your list based on location. If you customize campaign send time based on subscriber local time you can get better engagement. The best time to send on week days is usually 6-10am local time.
- If bulk of the emails on your B2B list are not major providers, you can actually send a large campaign by simply segmenting out the top providers using an email domain check, e.g. if “domain is” or “domain is not”. See example in the screenshot below.
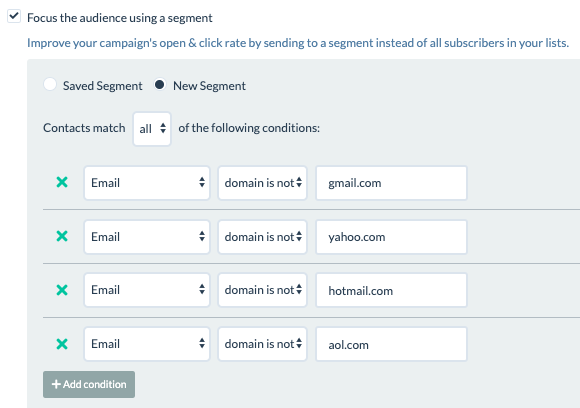
Segmenting based on email domain in BigMailer
Depending on your list size, you may choose to use and combine several of the methods listed above, and that’s perfectly fine. There is no one size fits all approach to building your domain reputation – you know your list best and can figure out the best strategy for yourself.
It may be frustrating to not be able to send to your entire list and put in all the extra effort, but the effort is worth it and will pay off via better long term deliverability, inbox placement, and most importantly your subscriber engagement with your email campaigns as a result.
by Lilia | May 2, 2019 | Uncategorized
A: Why I switched from [provider] to BigMailer
B: Why I moved my newsletter from [provider] to BigMailer
[SOME INTRO]
[It seems almost every day there is some story somewhere about a newsletter operator making 6-figure income on just a few hours a week.
Marketers are always on the lookout for tools that not only streamline their operations but also deliver exceptional results. And so switching from one email service provider to another is not uncommon, especially with so many providers to choose from. ]
[About Me / About My Newsletter/Website]
Why the Switch?
In Months of 202x, my list size in Mailchimp grew to over 10k subscribers and with fast growth I estimated I would likely double my list size in a few months. The cost in Mailchimp would have been several hundred dollars. So what started like a cost-effective way to start a newsletter would become a costly endeavor, especially if I didn’t figure out a way to monetize it fast. Monetizing a small B2C list isn’t easy, especially if you are not targeting a niche of professionals to sell sponsorships against. And so I started researching alternatives to Mailchimp.
I briefly looked at provider1, provider2, and provider3 and BigMailer stood out. Getting quick answers via live chat about feature comparison with Mailchimp was refreshing and cost estimate sealed the deal.
Making the Switch:
There are several steps that are needed to switch to BigMailer (or other provider):
- Verifying a sender domain or email with the new email platform. In BigMailer, you need to verify your sender domain by adding DNS records to confirm domain ownership. I had to do this in Mailchimp as well, so it’s not so different.
- Exporting your list from Mailchimp and downloading it as a CSV file. This step is critical to get right, because you might export your entire list instead of just the usable subscribers you want to import into your new platform. In Mailchimp it’s [label of the usable list].
- Importing your subscribers into BigMailer using the CSV file. In BigMailer, unlike Mailchimp, duplicate records are not allowed so a subscriber who is part of several lists wouldn’t be duplicated. The duplication in Mailchimp is a hidden cost multiplier! For example, if you had a list for newsletter subscribers and a separate list for paying site members any subscriber on both lists would be double counted against your billing total in Mailchimp, but not in BigMailer.
[some screenshots: exporting list from Mailchimp?]
Key Advantages of BigMailer:
There are several things that I liked when I was still comparing and others that were a pleasant surprise later on:
- BigMailer cost x2-5 cheaper than Mailchimp, depending on list size and plan you are on. I didn’t really use or need any of the advanced features or integrations in Mailchimp, so I didn’t loose any of the functionality I relied on for sending my newsletters.
- Drag-n-drop template editor with a template library. Starting with a pre-made template was easy and I ended up with a beautiful template I like more than the one I had before. [screenshot – email template in the drag n drop editor?]
- Deliverability (inboxing) rates were comparable at the beginning and much better than in Mailchimp once I started using segmentation and getting optimization suggestions from BigMailer support.
- Live chat support. It was refreshing to get timely answers to questions, especially during early on-boarding days.
[some screenshots: campaign list in Mailchimp and/or campaign list in BigMailer?]
Final Thoughts
[somethiing]
You can try BigMailer yourself with this link to get 30% discount on your first month.
Happy email marketing!

by Lilia | May 28, 2018 | Guides
If you’re a startup founder, a growth marketer in an early stage startup, a developer working on side projects, an aspiring professional blogger or simply someone who wants to be a data-driven decision maker, this post is for you.
When product your is past its minimum viable product (MVP) phase and in a growth phase, you can afford premium analytics tools. In the early stages, however, you probably don’t have a lot of data, so using one of the many available free tools to help you collect conversion and engagement metrics can be a smart choice. The data you’re able to collect and analyze in the early stages of product development is not only important in illustrating what channels and tactics work best, but it can also be crucial to your startup’s success or failure.
While there are many analytics tools available, none can claim the large-scale adoption and proven value of Google Analytics (GA). For purposes of this post, I’m going to assume you already have Google Analytics tracking set up on your website and dive straight into some conversion tracking instances that don’t require additional steps from a site owner or developer.
Conversion Tracking Using Google Analytics Goals
Effort: Minimal – you define your goals in the Google Analytics UI with no code updates required.
You can set up goals for your main non-sale conversions like email sign-up, free account/trial sign-up and product activation. These can help you understand your conversions from site visitor to member, trial member or email subscriber. For many products, you can also add goals as steps that indicate product usage, allowing for certain functionality that enables users to evaluate your product and its value.
To get started, go to the Admin tab on the bottom left (look for gear icon), find “Goals” link under Views.
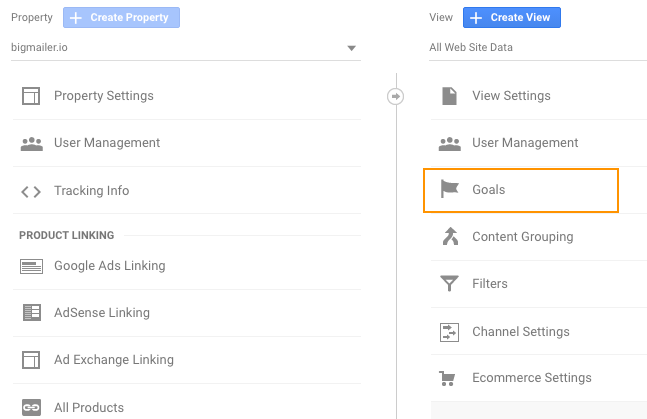
Click “Goals” and then “+ NEW GOAL.” From here, there are two simple ways you can define goals:
1 Use a unique URL path of the page that indicates a task completion such as /email-signup or /regi/welcome.
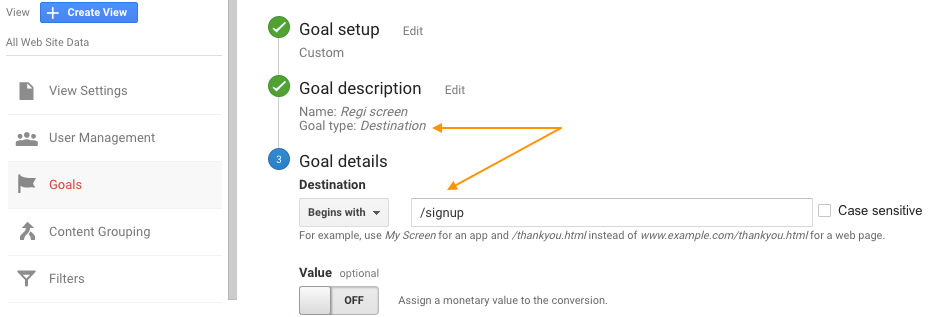
2 Use a unique name=value string that your site might already be using to indicate some other completed action. For example, you might be redirecting a user to the page they were on prior to creating an account and appending ?regi=true or ?email-signup=yes or a similar parameter to indicate to your application that the user just joined the site or mailing list. This can be used to display a custom welcome message or launch a tutorial-style widget to tell the user more about your site or product.
NOTE: Google Analytics allows you to assign a monetary value to a goal, but unless you’re actually using Goals to track sales or other actions you monetize (like automatically opting in your members to partner email lists or products during the registration process), you shouldn’t assign it. An exception would be if you only sell one product at one price point, like an ebook. You can actually use Goals to track your sales in this case, so you don’t need to read the rest of this post if your setup is that simple.
Email to Web Engagement Tracking Using Goals
Effort: Medium – depends on how and where you currently manage your emails.
If you send emails of any kind to your customers, make sure to tag all of them, marketing and transactional, with utm_ parameters.

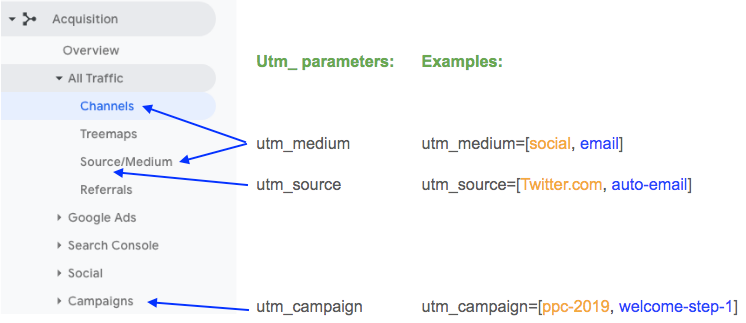
If you’re new to utm_ parameter tracking, check out this guide. At a bare minimum, always pass utm_medium=email on all links in your emails to attribute your traffic, engagement and sales to the Google Analytics “Email” channel. Many email providers have click tracking disabled by default (SendGrid, MailGun), so make sure to enable it first and define values, preferably at campaign level.
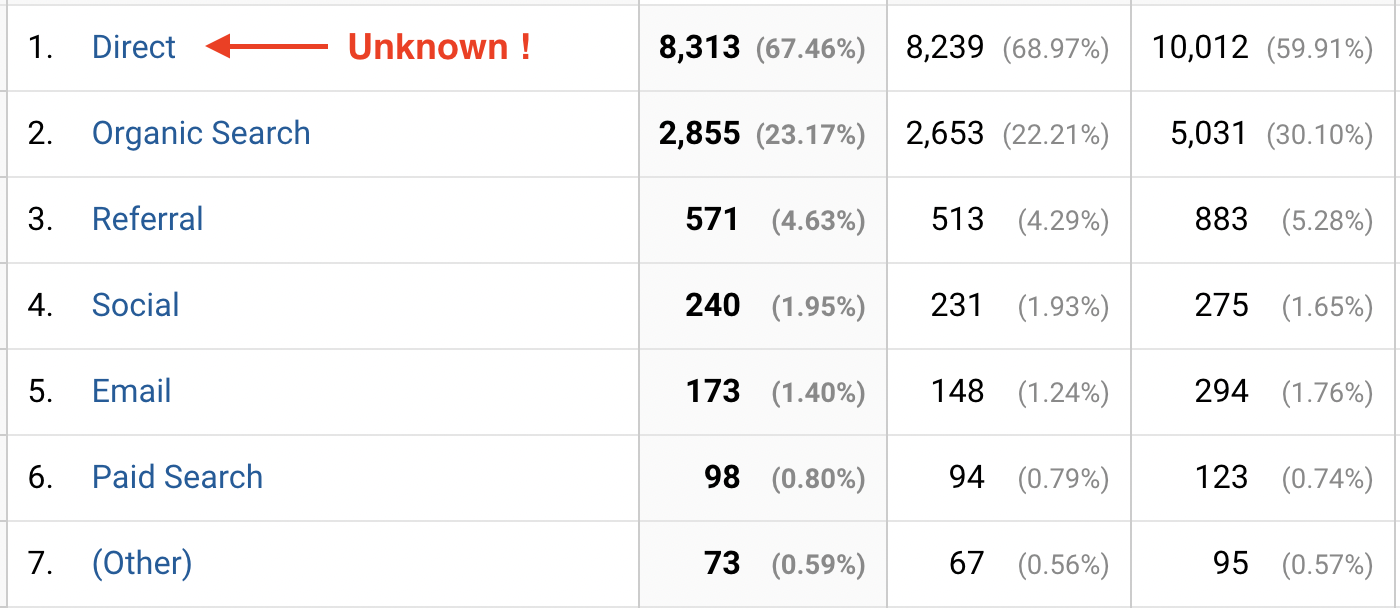
If your email links don’t pass utm_medium=email, your stats will be attributed to catch-all “Direct,” “Referral” or “Other” channels depending on the email provider you use and the email clients your subscribers use. Once you add utm_medium=email, your stats will shift from one or more of the other predefined channels in the Email channel.
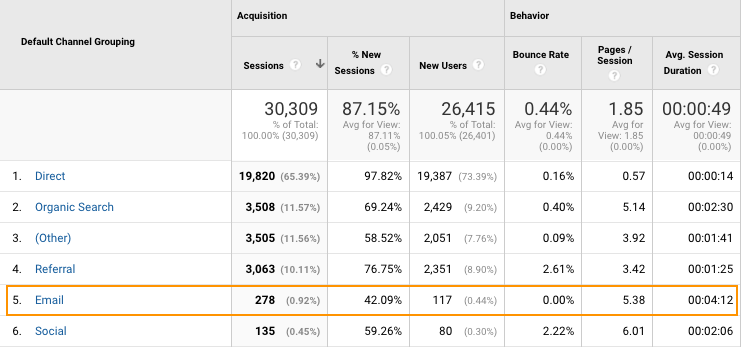
Utm_medium should always be set to “email” for your email links. If you set utm_medium to something you came up with yourself and it isn’t a convention, like email-[provider], then all your data will be attributed to the Other channel.
Conversion Tracking for Pay-Per-Click (PPC) Campaigns
Effort: Medium – requires your developer to drop the code in the right place but without customizing it.
If you run any PPC campaigns, simply drop the conversion tracking code (aka “pixel”) from your network to your subscription confirmation page. PPC platforms such as Google AdWords, Facebook, Pinterest, and many others all offer the option of adding a tracking code to your site. This allows you to track the return on investment (ROI) for your campaigns and ads inside those platforms.
E-commerce Conversion Tracking
Effort: Medium to Large – requires a developer be familiar with the checkout setup to drop the code and add values from the application into the code.
The best thing you can do for your conversion-to-paid tracking is to add e-commerce tracking from Google Analytics and pass the value of the sale or initial (first month/year) subscription from the sale/subscription confirmation page to Google Analytics. This will assign sales/revenue to the appropriate channel automatically, and you’ll even know what landing page the user originated from (i.e., an individual blog post) if you drill down to report by landing page (“Behavior” tab on the left > “Site Content” > Landing Pages).
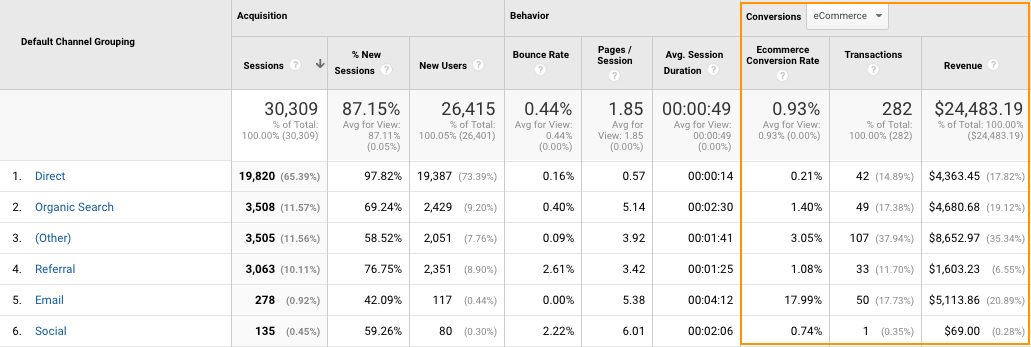
Google Analytics Report Example: E-commerce Data by Acquisition Channel
IMPORTANT: If you sell in more than one country and display prices in multiple currencies on checkout or receipt/confirmation pages, make sure to convert the value to your desired currency before adding the information to the e-commerce tracking code. Your e-commerce data in Google Analytics will otherwise be an irrecoverable mess until you fix it.
Special Case – You Offer a Free Trial
Effort: Large – requires development work, including database work.
Typically, when someone signs up for a free trial that requires a credit card, they’re moved to a paid plan after the trial period ends. If your product supports this model, then the goal and e-commerce tracking described above will only track your free trials and not the actual revenue you collect unless you’ve included a custom step in which a user manually upgrades and chooses a plan or adds a payment method.
One way to track your sources of revenue beyond a free trial is to record referral data (http_referer and utm_ parameter values) to your database during the conversion to trial step. This will provide a referral source for each trial record. To implement this process, record a referral source (check HTTP referer and/or utm_ parameters on query string) into a cookie, and then record the source from the cookie into your database with the account record during the trial sign-up step. You can later cross-reference that record with subsequent renewals and determine your churn, life time value (LTV) ratio and ROI for the individual acquisition channels or specific PPC campaigns (if you use unique utm_campaign parameter for each PPC campaign).
For more info on implementing custom conversion tracking, check out Building Your Own User Analytics System in SQL from Periscope, which was written for developers and outlines an implementation in great detail (data tables, columns, etc.).
Did you find this article helpful? Was there anything you wish we covered in more detail or provided examples for? Please share your feedback in the comments.
Happy conversion tracking and growth hacking!


 Follow these steps to delete any List:
 If you choose this option, all contacts in this list will be removed across all your lists in a single brand. Contacts deletion will be scheduled for removal within 24 hours and appear as Pending until it’s complete.


